
Scratches to the surface of a new epoxy resin table or a freshly completed bartop is super frustrating. They will occationally occur no matter the type of project or epoxy resin being used.
Fortunately, it does not have to be a permenant eye sore.
We have a solution to help bring it back to life while significantly reducing the likelyhood of repouring an entirely new layer of epoxy resin to the surface. ✨🪵
Let us start by cleaning and drying the entire surface area.
Next, pick up or rent a buffer with polishing pad (or similar depicted in photo).
Grab some Meguiar’s Mirror Glaze - Pro Speed Compound. A general polisher should get the job done, but we like Meguiar’s Mirror Glaze. It can be found at most hardware stores too.

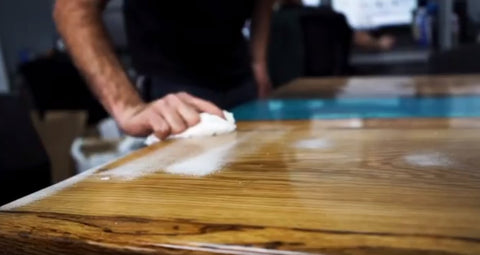
Apply a liberal amount of the glaze to the tabletop. Use the buffer to work the glaze into the tabletop’s affected area first. Ultimately you will want to buff the entire surface, but we like to give the scratched area a little more attention to start.
Once we buff/polish the entire surface, we used a simple glass cleaner and rag to wipe it clean.
Bam! Now we should have a super glossy table again without scratches.
*** You may need to repeat the method an additional 1-2 times depending on the depths of the scratches. One pass can typically resolve superficial scratches.

Here is a quick demo video of the process to follow on our Instagram
https://www.instagram.com/p/Cc8kI0dDcy3/
***Disclaimer*** If those superficial scratches actually turn out to be Deep Gouges even after you try this method, the next step would be to consider another flood coat of epoxy resin.
Be sure to thoroughly clean the surface area and lightly sand prior. This helps create a better chemical bond between the old layer and new layer.
Let us know what you would like to create below in the comments.
**If you made it this far down, We occasionally pick the best comment to win a giveaway. -hint-hint
We created a handy comparison guide to help understand the different properties of our epoxy resin. Just follow this link here https://www.theepoxyresinstore.com/blogs/news/what-epoxy-resin-is-best-for-my-project
https://www.theepoxyresinstore.com/ is an expert manufacturer of various epoxy resins that can be used for both craft projects and industrial applications. We also offer colors, pigments, glitter, and other additives for various epoxy resin projects.
The Epoxy Resin Store
support@theepoxyresinstore.com
Phone: (951) 677-0400
Address: 540 Crane St suite A Lake Elsinore, CA 92530
https://www.theepoxyresinstore.com
Social Accounts:
https://www.facebook.com/TheEpoxyResinStore
https://twitter.com/epoxyresinstore
https://www.linkedin.com/company/the-epoxy-resin-store
https://www.youtube.com/channel/UC3NKcCrYL5uHK-sH5XMQ9HA
https://instagram.com/theepoxyresinstore


4 comments
Hi, I am a 74 year old nana who LOVES woodworking! I was finishing a cedar live edge table with an epoxy “koi pond” sunk in the middle. I knew epoxy was not as scratch resistant as polyurethane, so I put a coat of oil base gloss poly over the resin and wood. Oops — forgot to remember that this finish tends to look amber so my epoxy was not completely clear anymore. I have spent all day sanding the epoxy and plan to sand more tomorrow and apply Meguiar’s Mirror Glaze. Any suggestions that differ from this?
Hi.love your videos, I was wondering..I colored my epoxy and poured it on my fractual burn piece, but it has no colour..nice and shiny but no colour.
As usual, we appreciate your sharing of tips like this one. Thank You !
That seems like a good method. Another good method is to sand surface lightly with 120-180 grit sandpaper, making sure to round off any sharp edges on deep scratches, and pour a new coat of bartop epoxy over the existing. I use a cheap paint brush to spread it and catch any drips. Make sure to mix properly and thoroughly and apply in 80’f temperature or higher for the best hardening.