
Today, I'll walk you through the ins and outs of turning a boring tumbler into a gorgeous epoxy tumbler with a vinyl wrap and glitter.
Whether you’re looking to add some sparkle to your drinkware or searching for a personalized gift idea, this tutorial video is for you. https://youtu.be/3OLsy49mhM8
Materials Needed
To get started on your custom tumbler, you'll need a few supplies:
-
A 15-ounce tumbler (lid removed)
-
A tumbler spinner – essential for an even coat
-
'Lightning Cure' epoxy from the Epoxy Resin Store
-
Glitters of choice – we’re using pink glitter from CNS Glitter Emporium and 'Kiss the Girl' by Freedom Glitters
-
Mixing sticks and cups for the epoxy
-
A torch (the bigger, the better, but any will do)
-
A vinyl sheet for decoration
-
A paper slicer for cutting the vinyl accurately
-
A sanding block for prepping the tumbler surface
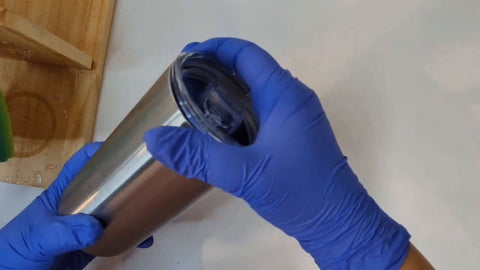
Preparation
The first step is to buff your tumbler using the sanding block. Give it a good scuff to ensure the surface is ready to bond with the vinyl and epoxy. Once scuffed, take your vinyl sheet, precisely cut it to the desired width, and gently wrap it around the tumbler. To ensure a smooth application, peel the backing gradually and press the vinyl into place, making adjustments as required.
"All I'm going to do is press it down and smooth it out as I go," Cyn explains.
For those uniquely shaped designs, creativity is key. Fold and cut the vinyl as necessary to achieve the look you're aiming for.
It's go Time!

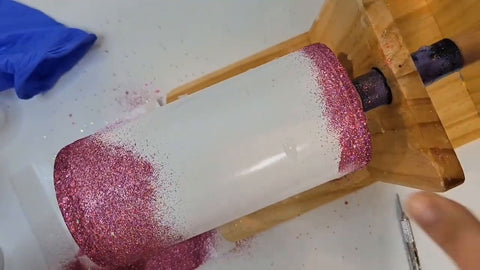
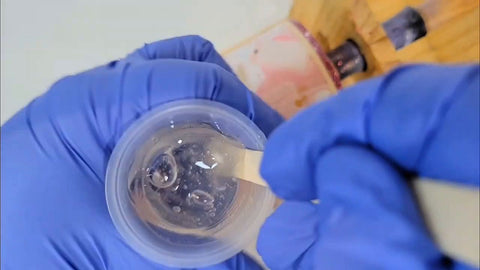
Mix equal parts of ‘Lightning Cure’ epoxy. We’ll use a total of 5 milliliters – that’s 2.5 milliliters each of Parts A and B. Give it a vigorous mix for about 60 seconds. Now, it’s time to bring on the sparkle! Start with the chunky glitter – in this case, 'Kiss the Girl'. Sprinkle it generously onto the tumbler, and remember to gently press it down so it adheres well. Don’t worry about the fine glitter just yet, we’ll get to that.
Seal the Deal
Remove the tape and apply a thin layer of epoxy over the vinyl areas only. This prevents glitter from straying onto the vinyl during the next step. Wait about five minutes, courtesy of the fast-acting ‘Lightning Cure’ epoxy, before proceeding to seal the glitter with more epoxy. Go easy to avoid clumping.
The Final Touches
Ready for the home stretch? Mix a heftier batch of epoxy – we're going with 15 milliliters of Part B and 7.5 of Part A. This time, apply it over the entire tumbler for a seamless finish.
Cyn's Tip: “Pour the epoxy with one hand and smooth it out with the other, using light pressure to guide it gently over the cup.”
Use the torch to remove air bubbles and give the tumbler a professional finish. Operating the spinner, let the cup turn for about 20 minutes before switching it off, but don't handle it until 45 minutes have passed.
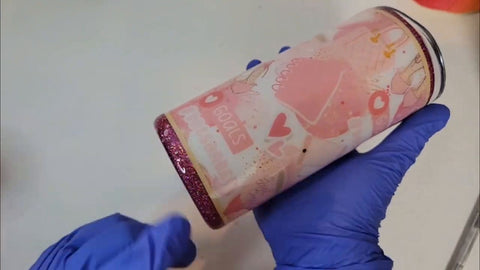
The Big Reveal

After about 45 minutes, you can safely remove your tumbler from the spinner. What awaits is a stunning, glittering masterpiece that's sure to dazzle.

Wrapping Up
Thanks so much for joining me in this DIY adventure. If you loved the tutorial, please hit ‘like’ and subscribe to the Epoxy Resin Store's YouTube channel for more inspirational projects. Don’t forget to give them a follow on social media, too!
Until next time, keep crafting and let your creativity shine!
Remember, crafting is about making something unique and special, just like yourself. So, unleash your imagination and have fun with it – the possibilities are endless.
We hope this step-by-step guide has helped spark some creativity and encouraged you to try your hand at making your very own epoxy tumbler.
Stay tuned for more epoxy resin guides and be sure to check out our other blog posts for more tips and tricks.
Comment "Epoxy Resin Tutorial" Below if this was helpful to you and you want to see more.
ps... we are selecting winners for the upcoming giveaways by reviewing the best comments on our blogs and youtube channel. - hint hint


3 comments
Epoxy Resin Tutorial
Thanks!
Epoxy resin tutorial
Epoxy resin tutorial