
The Secret to Making Acrylics Pop
Learn how to transform acrylic art by coating with epoxy resin in this video. https://youtu.be/muDUv7F6qsE
Ever noticed how your acrylic pour fluid art loses its luster after it dries? Those vibrant colors and stark contrasts you initially fell in love with dull down and seem less striking. But don't let that dishearten you – I'm about to share a simple yet incredibly effective method to bring back that 'just poured' look to your art.
Required Materials
- Acrylic art piece
- Supergloss epoxy resin
- Mixing cups
- Stir sticks or a drill paddles
- Propane or butane torch

Before we get into the nitty-gritty, let me ease your mind with a little reassurance. This is a forgiving and flexible process designed to cater to artists and crafters of all skill levels. Our goal is a relaxed learning environment, so pull up a chair and follow along.
Step-By-Step Guide to Epoxy Coating
Measuring for Perfection
To kick things off, grab your Supergloss epoxy resin. This is the hero product that's going to give you that glass-like finish. First off, we need to measure out the resin – and for Supergloss, a one-to-one ratio does the trick. I've got a small art piece here, roughly a foot and a half by a foot, so three ounces of resin should cover it. However, it never hurts to mix a touch more just in case.
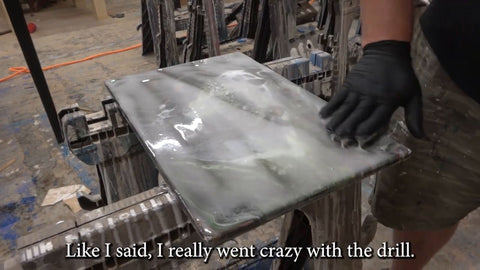
Whisking up a Storm
Confession time: I can be a tad overzealous with my drill mixer. It's easy to get carried away and trap lots of air in the mix, which turns your resin white and foamy. No panic necessary, though – I'll take you through how to fix that up.
Pour it On
Once your resin is mixed, it's time for the magic. Pour that Supergloss goodness over your acrylic art piece. It's like giving your artwork a drink of water after a long drought – those colors and lines will jump right back out at you, as bold and beautiful as the day you painted them.
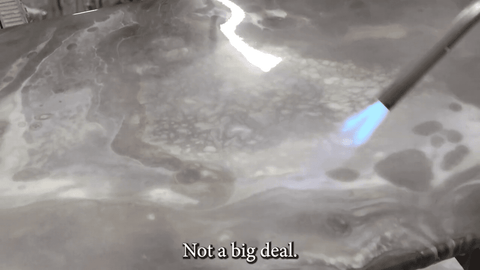
Patience and a Light Touch
When dealing with those pesky air bubbles (especially after a drill-induced frenzy), resist the urge to torch excessively. Instead, arm yourself with patience and a lighter touch. Torch the resin in several passes, allowing time in between for the resin to settle. You'll watch as the white fades and those bubbles bid farewell, leaving you with clarity that rivals the transparency of glass.
The Final Reveal
After those final touches and patience, you'll have a piece that's not just coated, but revitalized and rejuvenated. The result is a stunning, professional-grade finish that echoes the very essence of your original creation.
"The key to unlocking the beauty in your acrylic art is not just the medium itself, but what you do with it after."
Tips for Selling Your Epoxy-Resin-Coated Art
And if you're wondering whether such a simple process can truly make a difference when showcasing or selling your work, I'm here to tell you – it absolutely does. By applying epoxy resin to my pieces, I've been able to share and sell them all over the globe.
Wrapping Up
I hope this guide inspires you to experiment with epoxy resin and explore its potential to transform your artwork. Remember, practice makes perfect – and with a little epoxy resin, you're well on your way to making pieces that not only stand out but stand the test of time.
If you found value in this tutorial, I'd be grateful if you could show some love by doing three things:
- Comment "Epoxy Resin Tutorial" below in the comments
- Consider subscribing to our youtube channel
- Tag us in your next project.
Ready to coat your artwork with confidence?
Head over to The Epoxy Resin Store for all the supplies you'll need for your next project.
Stay tuned for more epoxy resin guides and be sure to check out our other blog posts for more tips and tricks.


