
Let's review our demo video on how to Create a custom charcuterie board! or Cereal tray 😆
This is a super creative project by Artist: @resin_works_bo
Demo videos are located below.
Here is what we need to start:
- WoodCrafters Epoxy Resin for the Base Epoxy Coat: https://www.theepoxyresinstore.com/collections/tabletop-bar-epoxy-resin/products/crystal-clear-epoxy-resin-tabletops-bars-woodcrafter
- White Liquid Pigment for the Milky Effect: https://www.theepoxyresinstore.com/collections/opaque-liquid-pigments/products/white-opaque-liquid-pigment
- Cereal. no affiliation yet. 😆
- Deep Pour Epoxy Resin to encase the work:
https://www.theepoxyresinstore.com/collections/river-table-epoxy-deep-pour-epoxy-resin/products/deep-pour-casting-epoxy-resin-for-river-tables-clear-glossy-finish-3-to-1-ratio
- SuperGloss Epoxy for the Glossy finish: https://www.theepoxyresinstore.com/collections/tabletop-bar-epoxy-resin/products/super-gloss-epoxy-resin
- Kiln dried or treated wood boards - sanded and leveled out.
Step 1: Eat some cereal.
Get your favorite cereal & Eat some before we ruin it all with epoxy resin. 😆

Step 2: Prep the wood boards.
They should be level and sanded prior. We run them through a planer to speed up the process and then use 220 grit sandpaper on the surface afterward to smooth it out a little more. Just our preference.
Look out for any holes or loose knots that may need removal or even pre-sealing. If the wood is very porous, we recommend pre-sealing the live edge and possibly bottom to prevent pesky bubbles from surfacing. Allow it to cure prior to moving to the next step if pre-sealing.

Step 3: Secure the molds.
Place the boards into a prepped mold that fits appropriately. Make sure the board is secured to the mold with a clamp or heavy weight. They tend to float if not.

Step 4: Create the base coat.
To create the base coat we will mix up a batch of WoodCrafters Epoxy Resin. This is a 1:1 ratio epoxy resin. We mix together an equal part of both part A and part B.
After stirring and scraping both the bottom and edges of the mixing cup, for approximately 2-5 minutes we are ready to add a small amount of our white opaque pigment.
Add enough white pigment to get your desired milk effect. We stir for another 1-3 minutes until thoroughly mixed.
Step 5: Pour the epoxy resin base coat (milky effect).
In this demo, we poured just enough to cover the bottom 1/3 of the wooden board. This gives us enough space to add the cereal to the top without peaking through the surface.

Step 6: Add the cereal.
Now that we have the base coat poured, it is time to add the cereal.
The goal is for the cereal to lay out and be in contact with the base coat. Push a few into the mix more than others to appear more realistic.
***Don't overtake the surface. Keep the cereal below the top of the board. Leave a little extra space for sanding down too.
***Allow 24-48 hours to cure the milk base.

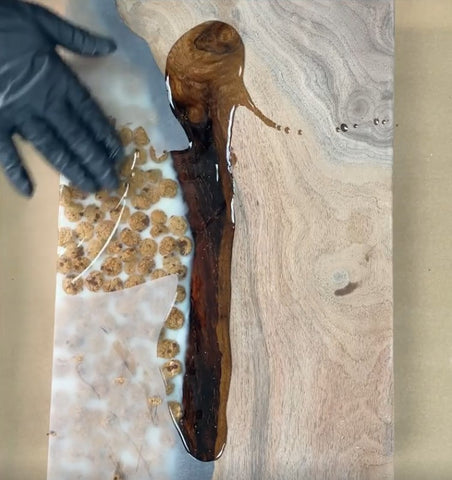
Step 7: Add Deep Pour Epoxy.
Now that the base is cured, we are going to add Deep Pour Epoxy Resin to encase our work. We are using the deep pour because it is very viscous (watery) and will help reduce air entrapment with the cereal (fewer bubbles).
Deep Pour Epoxy Resin is a 3:1 ratio mix. So we need to combine 3 equal parts of Part A with another equal part of Part B.
We slowly mix this for 3-5 minutes ensuring we are scraping the bottom and edges thoroughly.
Now we can slowly pour onto our project, covering the cookies and slowly reaching the top of the live edge.

Step 8: Monitor the project for the next few hours.
Use a small hand torch (waving 6-8 inches from the surface) to release any bubbles that were trapped within the cereal. This may require more attention than a normal pour.
Step 9: Demold and sand.
This is typically where all the work is done. We highly recommend a planer & power sanders.
You will notice the epoxy appears scratched and cloudy. This is normal when sanding. It will clear up after adding SuperGloss to the surface.
Once you reached the desired feel for the charcuterie board, clean it and dry it.
Step 10: Time to add SuperGloss Top Coating.
This is a 1:1 ratio epoxy resin. We mix together an equal part of both part A and part B.
After stirring and scraping both the bottom and edges of the mixing cup, for approximately 2-5 minutes we are ready to pour. Once the board is thoroughly covered with SuperGloss, let it cure and dry to touch for at least 24 hours.
Final Step: Add handles and enjoy.

Play with the different types of cereal prior. Some tend to look soggier than others after being exposed to epoxy. Below are some examples.


We Hope this was delicious.
Let us know what you would like to create below in the comments.
**If you made it this far down, We occasionally pick the best comment to win a giveaway. -hint-hint
We created a handy comparison guide to help understand the different properties of our epoxy resin. Just follow this link here https://www.theepoxyresinstore.com/blogs/news/what-epoxy-resin-is-best-for-my-project
https://www.theepoxyresinstore.com/ is an expert manufacturer of various epoxy resins that can be used for both craft projects and industrial applications.
We also offer colors, pigments, glitter, and other additives for various epoxy resin projects.
- All in one store - The Epoxy Resin Store
support@theepoxyresinstore.com
Phone: (951) 677-0400
Address: 540 Crane St suite A Lake Elsinore, CA 92530
https://www.theepoxyresinstore.com
Social Accounts:
https://www.facebook.com/TheEpoxyResinStore
https://twitter.com/epoxyresinstore
https://www.linkedin.com/company/the-epoxy-resin-store
https://www.youtube.com/channel/UC3NKcCrYL5uHK-sH5XMQ9HA
https://instagram.com/theepoxyresinstore
#epoxyresin #resinart #epoxy #resin


7 comments
Too bad I’m not crafty enough to do this myself lol but I LOVE the cookie and trix trays! They are so cute! I wish you sold them done already 😊
As a newbie trying my best to learn on my own, your instructions were amazing. I think I may be closer to tackling a project! I’ve been shopping around for the best resin to buy.
Such a great idea. These would make adorable little trays for the kids.
Super cool, I will have to give it a go. Great instructions also.
Wow! Would make awesome house warming or really any type of gift! Such a great idea!