

Yes, you heard it right. We're about to take that old, grimy plain white sink and breathe new life into it, making it look absolutely stunning. So roll up your sleeves; it's going to be a fun ride!
Transform an outdated bathroom sink affordably in one day using epoxy resin with step-by-step application guidance in this DIY home remodel tutorial https://youtu.be/ACmEpxJgtCk.
Products used in this sink makeover:
*We may use Amazon affiliate links to products we like, meaning if you buy something, we'll receive a small commission.
Prep and Prime - Getting Started
Before we dive into the nitty-gritty, let's get our workspace ready. Start by slapping some green painter's tape around your sink–this will be our safeguard against any spills or mishaps during the process.
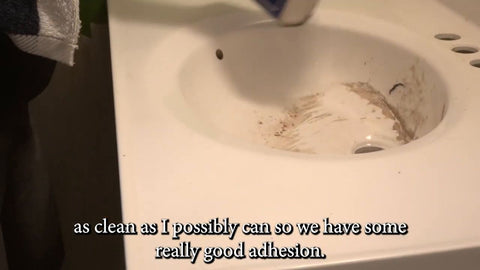
Once that's done, we move on to prepping the surface. If your sink is anything like the one we've got, it’s seen better days, sporting a charming combo of "boogers" and old epoxy. But fear not!
Grab a chisel and scrape off any residue. Then, vigorously wipe it down until it's clean. Remember, a pristine surface is your best friend for ensuring that your new finish sticks.
"When everything's all prepped, acetone will be your secret cleaning weapon. It's a powerhouse that not only annihilates any lingering gunk but also evaporates in a snap, letting you swiftly proceed to the next phase."
Applying the Primer
With the sink sparkling clean, it's prime time—literally! We’re going to use a primer that loves smooth surfaces: Eco prim grip. It's readily available at your local hardware store and is your ticket to creating a robust, textured surface for the epoxy to bond.
With a trusty chip brush in hand, apply the primer evenly. This step requires a bit of patience since the product won’t self-level. So, ensure you cover the entire area without leaving any pile-ups, as you want the base as smooth as your grandpa's dance moves.
Texture Like A Pro
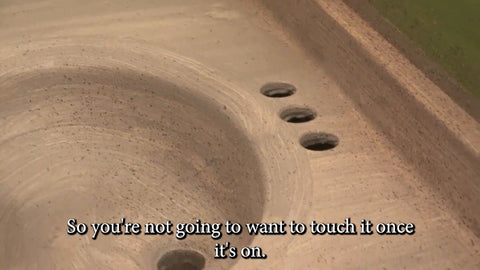
Next up, Rust-Oleum stone effect spray will be our star player. It adds that coveted texture to mask any imperfections below. Just like when you used to play with shaving cream as a kid, spray a generous coat and then—hands off!—let it work its magic and dry.
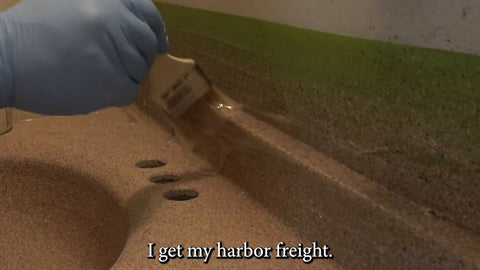
"I'm just taking a wet cloth here. Crocodile wipes are my favorite—quick swipe, and any overspray is history."
The beauty of this spray? Even if it initially looks a bit untidy, it's forgiving. You’ve got time to clean up any mess before it dries.
Epoxy Application: The Transformation
After a good night’s rest (for you and your sink), it's time to make things glossy. We're reaching for the supergloss epoxy—hand down the showstopper for achieving that glass-like, high-shine effect.
Measure about 20oz; believe it or not, a little goes a long way with this powerful stuff. Now, when mixing, go all Sherlock Holmes on it—be thorough.
Scrape the sides, the bottom; leave no corner unmixed. People often falter at this stage by hastening, but not us. We ensure our mixture is perfect.
Bronson's Bro Tip: Save big on chip brushes by buying in bulk and always remove loose bristles ahead of time to avoid a hairy disaster!
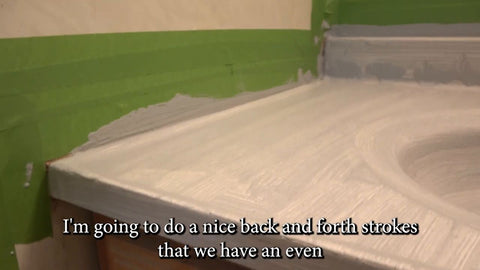
Starting from the back top edge, work your way down with the epoxy, adequately addressing vertical surfaces because gravity can be tricky there.
Keep it wet but not too thin as we still want to maintain a generous coat. Really, don’t be shy with the epoxy—slather it on generously!
Finishing Touches - A Smooth Finish
Once the sink is fully coated, let it sit for 10 minutes or so. Bubbles will likely appear; that’s just epoxy being epoxy. Brandish a torch briefly over the surface—swift strokes are your mantra here. Remember, the goal is "one pass for glass."

To tackle any drips, arm yourself with a tongue depressor (no medical degree required) and swipe around the edges every 10-15 minutes for a couple of rounds. This trick spares you from sandpapering later.
Finally, while everything's still sticky, peel off the tape for a clean, sharp line. It’s strangely satisfying—like peeling plastic off a new phone, but better because you just revived your sink!
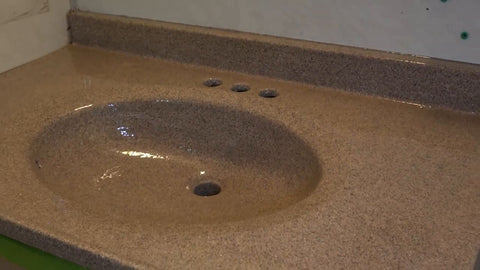
And there you have it—an epoxy bathroom sink makeover that's not only budget-friendly but also a total visual delight. So, go ahead, get started on your next epoxy resin makeover project today!
Let's keep making the ordinary, extraordinary!
👉👉 If you liked this video and want to see more
👉👉 Comment "Epoxy Resin Tutorial" because that does two things.
1. It lets us know you like it, and encourages our creators!
2. Commenting gives you a chance to win within one of our upcoming givesaways. -hint-hint
https://www.theepoxyresinstore.com/ is an expert manufacturer of various epoxy resins that can be used for both craft projects and industrial applications. We also offer liquid inks, dyes, pigments, glitter, other additives, and tools for various epoxy resin projects.
The Epoxy Resin Store
support@theepoxyresinstore.com
Phone: (951) 677-0400
Address: 540 Crane St suite A Lake Elsinore, CA 92530
https://www.theepoxyresinstore.com
Social Accounts:
https://www.facebook.com/TheEpoxyResinStore
https://twitter.com/epoxyresinstore
https://www.linkedin.com/company/the-epoxy-resin-store
https://www.youtube.com/channel/UC3NKcCrYL5uHK-sH5XMQ9HA
https://instagram.com/theepoxyresinstore
#epoxy #epoxyresin #theepoxyresinstore
*We may use Amazon affiliate links to products we like, meaning if you buy something, we'll receive a small commission.


4 comments
Candice James
I like this, it looks so easy to do! “Epoxy Resin Tutorial”
Martha M Bryce
I have a slightly cracked sink. What would you fill the crack with before you do this?
Sandie
Epoxy Resin Tutorial gives me ideas for the house we just moved into!
Duane Wilk
Does this work with porcelain sinks